Why is My Peace Lily Drooping? (And How to Fix It Fast)
Some plants show up in every British flat for a reason. Our Popular Houseplant Care: Troubleshooting the UK’s Favorite Plants hub covers the UK’s favourites; this guide tackles one specific issue.
This page contains affiliate links. As an Amazon Associate we earn from qualifying purchases — this does not affect the price you pay.
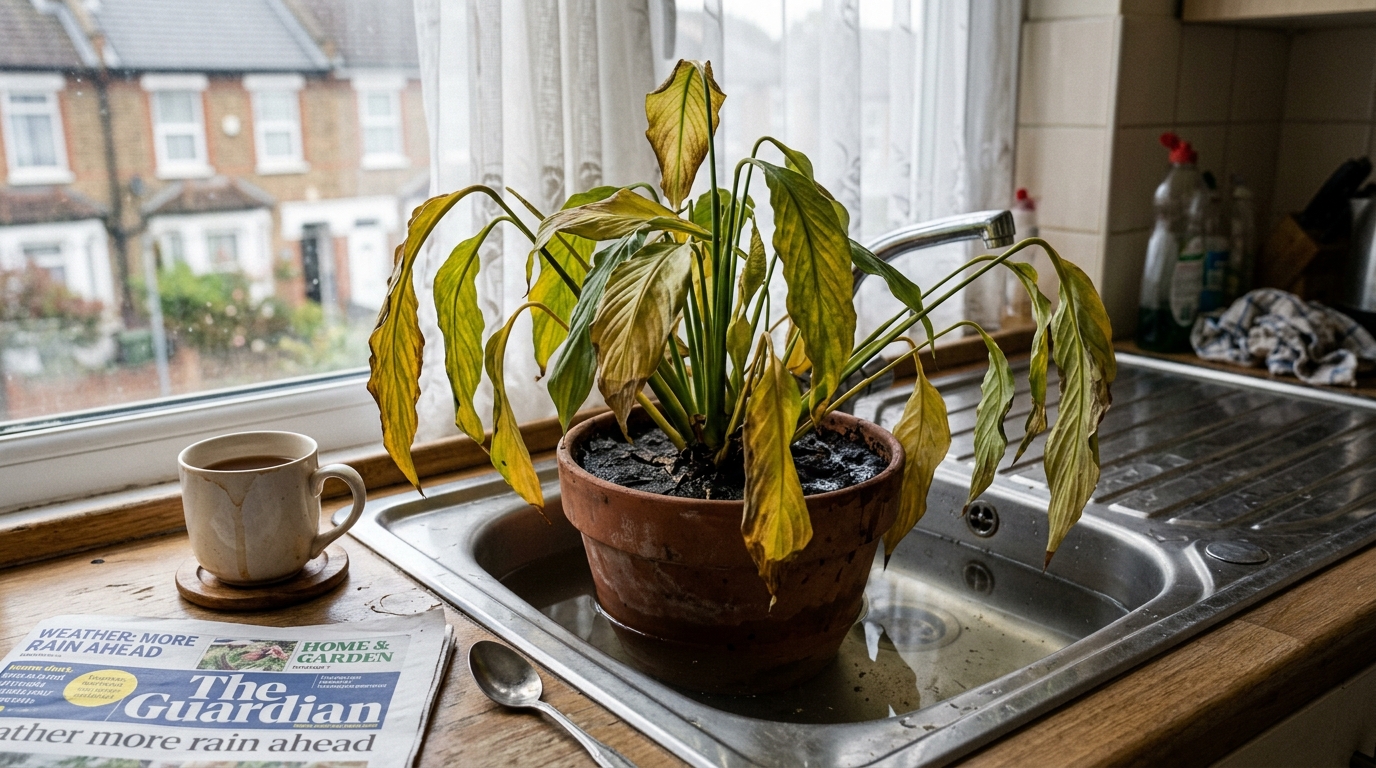
Your peace lily looking more like a sad lettuce is a special kind of panic, especially when you’re sure you watered it. In a typical British flat, forgetting is rarely the problem. It’s usually the dry, heated air or the hard tap water quietly causing havoc. Here’s how to fix it and see it perk up, often within a day.
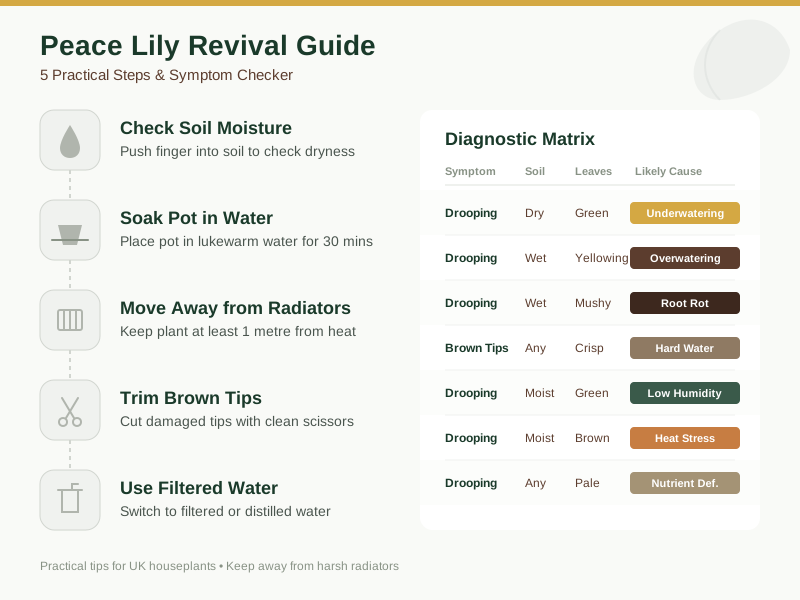
Quick reference: See the infographic below for a visual summary of the key points, or download the data table for full details.
Is my peace lily overwatered or underwatered?
Stick your finger into the compost up to your first knuckle. If it feels dry, it’s thirsty. If it feels wet all the way down but the leaves are droopy and turning yellow, it’s drowning—that’s classic overwatering leading to root rot.
The confusion happens because in our homes, the top centimetre of soil can bake dry from radiator heat in a day, while the core of the pot stays soggy. You think it needs water because the surface is parched, but the roots are already waterlogged.
A quick checklist to decide:
- Soil surface dry but soil a finger down feels moist → underwatering stress (drooping).
- Soil feels wet all the way down and leaves are yellowing or feel mushy → overwatering (root rot).
- Leaves are crisp and brown just at the tips → hard water build-up, not a watering issue.
We’ve been in forums where people swear they water daily, only to find the top is bone-dry while the root ball is a swamp. The finger test is the only way to cut through the guesswork.
Step 1 – The “Soak and Drain” Rescue Method
Why pouring water on top doesn’t cut it
In a typical UK pot—especially the shallow, decorative ones—water poured on top often just runs down the inside edges and straight out the bottom, never actually wetting the root ball. If you’re using peat-based compost (which most of us are), the RHS notes it can become almost waterproof if it dries out completely. Add a splash of hard tap water on top of that, and you’re shocking the roots with a cold, mineral-heavy drink they can’t even absorb.
The method (do this now)
- Fill a sink or bucket with lukewarm water. Aim for roughly 20°C—room temperature, not straight from the cold tap. Tepid water is absorbed much more easily and won’t shock the roots.
- Place the pot in the water. Take it out of its decorative saucer and sit it in the sink so the water comes about halfway up the side of the pot.
- Leave it for 30 minutes. The soil will soak up water evenly through the drainage holes. This bottom-watering method hydrates the entire root zone without drowning the crown of the plant.
- Remove and let it drain. Lift it out, let it drip over the sink for a good five to ten minutes, then put it back on its tray.
If you have a filtered-water jug, use it—it bypasses the hard-water shock. A peace lily in a north-facing room can droop constantly despite daily watering. One proper 30-minute soak with filtered water, and the leaves stand up straight within a few hours.
Step 2 – The “Central Heating” Adjustment
The radiator effect
British winter heating is a silent killer for tropical plants. That warm, dry air pulls moisture straight out of the leaves faster than the roots can replace it, leaving them wilted even when the soil is damp. It’s why your plant can look like it’s been left in a desert while the radiator hums away right below it.
The fix
- Move the plant at least a metre away from any radiator or direct heat source.
- If you can’t move it, place a thick towel or a small board between the pot and the radiator as a heat barrier.
- For a simple humidity boost, use a pebble tray. Pop some pebbles in a saucer, place the pot on top, and keep water in the tray. The evaporating water raises the humidity right around the leaves.
- In darker, north-facing flats, a bit of extra light from a modest LED lamp can help the plant process water and nutrients more effectively.
A peace lily parked behind a radiator can droop constantly for that reason alone. Moving it a short way to the side, out of the direct heat, is the first thing to try.
Step 3 – The “Brown Tip” Treatment
The cause
UK tap water is often hard, meaning it’s full of minerals like calcium and magnesium. Over time, these build up in the soil and on the leaves, eventually scorching the delicate tips. It’s especially common in the south and east of the UK. The droop might be from thirst, but those crispy brown tips are a separate, tell-tale sign of hard water.
The fix
- Trim the brown tips with clean scissors. Just snip off the damaged crispy bit, following the natural shape of the leaf. Don’t pull it, or you’ll tear healthy tissue.
- Switch your water source. Use filtered, rainwater, or distilled water for a while. On a budget? Fill a jug and let it sit open for 24 hours; some of the minerals will settle, and you can pour off the clearer water from the top.
- Give the leaves an occasional wipe with a damp cloth to remove any dusty mineral film.
Only switch from straight tap water after a third peace lily starts getting brown tips despite perfect watering. Using filtered water made a visible difference within a week or two.
How to Keep a Peace Lily Happy in a UK Flat
📺 Watch: My Top 7 Houseplants And How to Keep Them Thriving! — Gardening With Alan Titchmarsh
Watering schedule
- In winter, check the top inch of soil every few days. If it’s dry, give it a soak. In summer, you might stretch to every 5-7 days, but always do the finger test first.
- Never let it sit in a puddle. Always empty the saucer after watering.
Light
Bright, indirect light is the sweet spot. A south-facing windowsill is good, but pull it back from direct sun which can scorch the leaves. In a darker north-facing flat, a basic 15W LED grow light can provide a helpful boost without costing much to run.
Pot and drainage
Make sure the pot has proper drainage holes that aren’t blocked by roots. If the plant is tightly root-bound, repot it into a container only 2-3 cm larger with a well-draining mix (a peat-free compost with some perlite mixed in works well).
A simple habit that helps: give the pot a quarter-turn every week so all sides get equal light. It stops one side from getting leggy while the other stays sparse.
Peace Lily Diagnosis Checklist
For the chronically unsure, the XLUX Soil Moisture Meter (paid link) takes all the guesswork out of watering. Stick the probe in, read the dial, and water only when it hits the dry zone.
View XLUX Soil Moisture Meter on Amazon → (paid link)
| Symptom | Soil Moisture | Leaf Condition | Likely Cause |
|---|---|---|---|
| Drooping | Dry | Green | Underwatering |
| Drooping | Wet | Yellowing | Overwatering |
| Drooping | Wet | Mushy | Root Rot |
| Brown Tips | Any | Crisp | Hard Water Build-up |
| Drooping | Moist | Green | Low Humidity |
| Drooping | Moist | Brown | Heat Stress |
| Drooping | Any | Pale | Nutrient Deficiency |
Before You Buy
You’ve now got the three-step rescue plan: soak it properly, move it away from the dryer-like heat of the radiator, and tackle hard-water tips. Stick to checking the soil properly, keep it out of direct heat, and those droopy leaves should stand to attention—often within a day.
If you want to make sure you never misdiagnose a wilt again, download our Free Houseplant Troubleshooting Checklist. It’s a quick reference you can pin up, so every plant gets the right care straight away.
For more on keeping your indoor jungle alive, have a look through the rest of the blog. You’ve saved your peace lily; now you can relax with a cuppa and enjoy a happier windowsill.
Related Guides
For a complete overview, see our Popular Houseplant Care: Troubleshooting the UK’s Favorite Plants.
Note: This guide provides general advice for UK conditions. Always verify specific plant needs and local water quality with a qualified professional or official source.
If you are dealing with related issues, see our guide to Monstera Leaves Turning Yellow.